A dedicated forum and online store for the Opae ula shrimp!
Water quality section
Page Index:
This process can take from 2 weeks to 2 months or longer to complete. It is vital for anyone planning on keeping Opae ula shrimp to understand this process. Learning about this process will help you to be successful in keeping shrimp and it should definitely improve your chances when breeding Opae ula shrimp. The best way to monitor the nitrogen cycle is to purchase an aquarium test kit that will test for ammonia, nitrites, nitrates and ph. I prefer liquid test kits myself as they are more accurate then dip stick test kits.
Test your aquarium water every other day and write down your readings. You will first see ammonia levels rising. A few weeks or so later you should see the nitrite levels rising and the ammonia levels dropping. Finally, after a few more weeks you should see the nitrate levels rising and the nitrite levels dropping. When you no longer detect ammonia or nitrites but you can detect VERY low nitrates you can assume that it is safe to add your shrimp and snails.

Nitrogen Cycle Stages
Stage 1
Here is an example of what you will see and read from the display;

Step 1 - Slowly fill the Instant Ocean Hydrometer by dipping bottom corner fill port below water surface until water flows up and over inner weir.
Step 2 - Dislodge air bubbles by gently tapping hydrometer or pointer. Air bubbles on the pointer may result in inaccurate results.
Step 3 - Place the hydrometer on a level surface and read specific gravity (inside scale) and salinity (outside scale).
A downside to the hydrometer is if you are only using a small tank you *may* struggle to fill the meter up enough to a get a reading without emptying the majority of your tank water out, thus stressing out the shrimp. If however you are using it just to make up batches of brackish water then it's absolutely fine to use. Unfortunately the 'Hydrometer' doesn't compensate the waters temperature if it's cold (below 20 degrees) and may show a slightly different reading when up to tank temperature. Being honest though this isn't really a game changer as Opae'ula are highly adaptable and adding your fresh brackish water during a water change can be slightly higher or lower in SG/Salinity and still be fine, plus you won't be doing many water changes to warrant this feature. If you are just wanting to take water out of your tank which is already up to the correct temperature then that feature from the 'refractometer' is pretty pointless.
IMPORTANT! information regarding the Nitrate test for liquid test kits.
Liquid Nitrate Test Kits from any manufacturer can have a common problem with their last test solution bottle. For some companies, it is bottle number 3, but for API liquid test kits it is bottle number 2. One of the ingredients wants to solidify out of liquid solution and stick to the bottom of the bottle. If the test bottle sits for any period of time, this can happen. If this does happen and the test is performed without Bottle # 2 being shaken and mixed properly, then you can get a false low reading. This can be corrected by tapping your Bottle # 2 firmly a few times on a table or counter top. This should loosen-up anything that has solidified in the bottom of the bottle. Then shake this bottle for about 2-3 minutes, to really mix it up before use. This method will prevent false readings and ensure your tank water isn't incorrectly tested for an unsafe level of Nitrates.
IMPORTANT! - Do not put the glass test tubes directly into your shrimp tank, if any of the test kit chemical is still in this when introduced to the tank directly there is a chance of poisoning your whole tank!
Pros:
• This kit will test all 4 important water parameters including ammonia.
• Compared to other test methods the liquid test kit is a lot more accurate.
• Each kit will provide you with over five hundred tests, so after the initial purchase you will save money as test strips have to be used once and thrown away.
Cons:
• The upfront cost is higher then test strips.
• You have to wash the test tubes after every use.
• Takes at least 5 minutes per test to complete.
Here is an example of an API liquid test kit:

Pros:
• Fast to measure water qaulity and get results.
• Initial cost is cheaper then a liquid test kit.
Cons:
• You can only use each strip ONCE.
• Not very accurate results which can be misleading.
• Does NOT measure ammonia.
Here is an example of an API Dip strip test kit:

2. Swirl 2 times.
3. Remove horizontally with pads face up.
4. DO NOT shake OFF excess water.
5. Compare to the colour chart on the tube.
6. Starting with the pad closest to your hand, immediately read General Hardness (GH) and Carbonate Hardness (KH).
7. Wait 30 seconds, then read pH, Nitrite (NO2-) and Nitrate (NO3-).
Since dissolved ionized solids like salts and minerals contribute to the conductivity of a solution, a TDS meter measures the conductivity of the solution which is then converted to a TDS reading.
TDS is directly related to quality of water i.e., the lower a TDS figure, the more pure the water. As an example, reverse osmosis purified water will have a TDS between 0 and 10, whereas tap water will vary between 20 and 300.
Here is an example of an TDS Pen:

1. Remove the protective cap.
2. Turn the TDS meter on. The ON/OFF switch is located on the panel.
3. Immerse the meter into the water/solution up to the max. immersion level (2”).
4. Lightly stir the meter to dislodge any air bubbles.
5. Wait until the display stabilizes. Once the reading stabilizes (approx. 10 seconds), press the HOLD button to view the reading out of the water.
6. If the meter displays a flashing “x10” symbol, multiply the reading by 10.
7. After usage, shake off any excess water from your meter. Replace the cap.
• Ammonia - 0ppm
• Nitrites - 0ppm
• Nitrates - as low as possible reaching over 10ppm and you are asking for trouble.
• PH - 8.0 - 8.4
• SG - 1.008 - 1.015
• TDS - 100 - 1500 (you really don't need to worry about this one)
• Temperature - Ideally between 18C [64.4F] to 25C [77F] (shrimp successfully 'berried'/produced eggs)
If your shrimp tanks water quality isn't very good/healthy then you put your shrimps, snails and other living tank creatures at an increased risk of dying. They are pretty 'hardy' shrimps but why scrimp on their health and your investment.
Introduction
Introduction
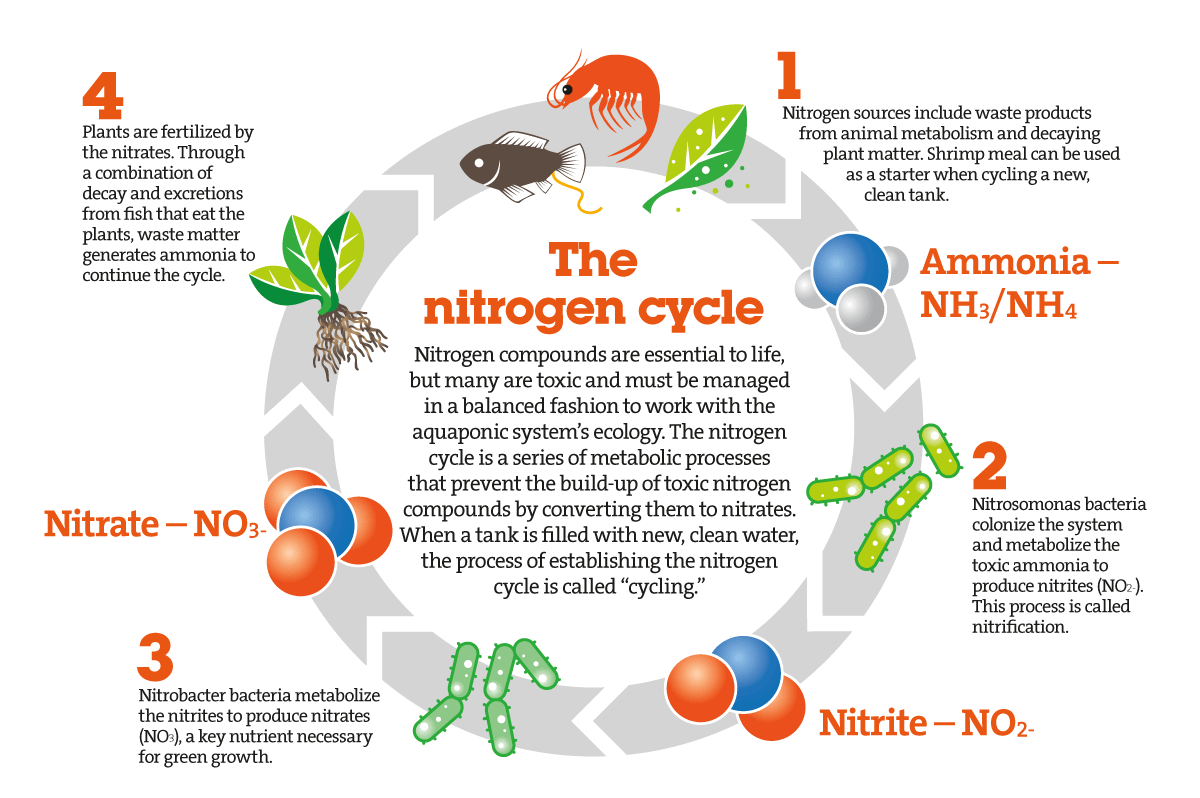
In this section i will explain a little about the 'Nitrogen cycle', what it is and why its important to complete it in your shrimp tank. You will also find here which tools and test kits to use to help you along the journey and information on how to use them. Although you may find some of the information tedious to read it is highly recommended to have a quick read so you get off on the right foot and have a very healthy Opae ula tank that thrives and produces many young.What is 'tank cycling' and the Nitrogen cycle?
The aquarium nitrogen cycle information presented below may be rather boring to most people, but it is absolutely essential to understand this process if you want to be successful at keeping Opae ula shrimp! Some call it the biological cycle, the nitrification process, tank cycling or even the start-up cycle. They all are referring to the same cycle - The Nitrogen Cycle. The aquarium nitrogen cycle is a very important process for the establishment of beneficial bacteria in the aquarium and in the substrate(sand or gravel) or filter media that will help in the conversion of ammonia to nitrite and then the conversion of nitrite to nitrates.This process can take from 2 weeks to 2 months or longer to complete. It is vital for anyone planning on keeping Opae ula shrimp to understand this process. Learning about this process will help you to be successful in keeping shrimp and it should definitely improve your chances when breeding Opae ula shrimp. The best way to monitor the nitrogen cycle is to purchase an aquarium test kit that will test for ammonia, nitrites, nitrates and ph. I prefer liquid test kits myself as they are more accurate then dip stick test kits.
Test your aquarium water every other day and write down your readings. You will first see ammonia levels rising. A few weeks or so later you should see the nitrite levels rising and the ammonia levels dropping. Finally, after a few more weeks you should see the nitrate levels rising and the nitrite levels dropping. When you no longer detect ammonia or nitrites but you can detect VERY low nitrates you can assume that it is safe to add your shrimp and snails.
Nitrogen Cycle Stages
Stage 1
Ammonia is introduced into the aquarium via shrimp waste and uneaten food. The shrimp waste and excess food will break down into either ionized ammonium (NH4) or un-ionized ammonia (NH3). Ammonium is not harmful to tropical shrimp but ammonia is. Whether the material turns into ammonium or ammonia depends on the ph level of the water. If the ph is under 7, you will have ammonium. If the ph is 7 or higher you will have ammonia.
Stage 2
Soon, bacteria called nitrosomonas will develop and they will oxidize the ammonia in the tank, essentially eliminating it. The byproduct of ammonia oxidation is Nitrites. So we no longer have ammonia in the tank, but we now have another toxin to deal with - Nitrites. Nitrites are just as toxic to tropical fish as ammonia. If you have a test kit, you should be able to see the nitrite levels rise around the end of the first or second week.
Stage 3
Bacteria called nitrobacter will develop and they will convert the nitrites into nitrates. Nitrates are not as harmful to tropical fish as ammonia or nitrites, but nitrate is still harmful in large amounts. The quickest way to rid your aquarium of nitrates is to perform partial water changes. Once your tank is established you will need to monitor your tank water for high nitrate levels and perform partial water changes if necessary.
How to 'cycle' your tank
Starting The Nitrogen Cycle WITH shrimp and snails
This is not the preferred way to get the nitrogen cycle started because the shrimp and snails are being exposed to ammonia and nitrites during this process. Some living tank inhabitants may not make it through the cycling process if they are weak or you do not carry out partial water changes to dramatically reduce the Ammonia and Nitrites while they rise during the cycle process.
Starting The Nitrogen Cycle WITHOUT shrimp and snails
There are a few different ways to get this process started:
Option 1: Using Fish/shrimp food
Drop in a few flakes every 12 hours. As the food decomposes it will release ammonia. You will have to continue to "feed" the tank throughout the process to keep it going.
Option 2: Use some 100% pure ammonia (unscented) that is used for household cleaning.
Using a dropper, add 5 drops of ammonia per 10 gallons of aquarium water. If you don't get an ammonia reading with your test kit, add some more drops until you start to see an ammonia reading. Keep track of how many drops you've used so you can repeat this process daily. Continue to dose the tank with ammonia until you start to get nitrite readings with your test kit. Once you can detect nitrites you should only add 3 drops of ammonia per 10 gallons of aquarium water, or if you added more drops originally to get an ammonia reading cut the amount of drops used in half. Continue this process daily until you get nitrate readings with your test kit. Do a 30% water change and your tank is ready.
Option 3: Use gravel, filter media, substrate, algae or water from an established and complete cycled brackish water tank.
This is the best and fastest way to go. This will seed the tank with all of the necessary bacteria for the nitrogen cycle. "Feed" the tank daily with flake food until you are getting nitrate readings. Depending on how fast you were able to get the gravel and filter media into your tank, you may be getting nitrate readings in only a day or two. Make sure your source has a [b]brackish only tank[/b] and not a marine, tropical or cold-water setup, shrimp will not tolerate copper, medications or other additives which may have been used in the donors tank.
Speeding Up the Cycling Process
There are things you can do to speed along the process of cycling your aquarium:
1. Increase the temperature of your aquarium water to 80°F-82°F (27°C-28°C) ONLY DO THIS IF YOU HAVE AN EMPTY TANK.
2. Get some beneficial bacteria colonies. Borrow some gravel from an established and cycled aquarium. If you have another tank with an extra filter you can use it. If you have a really nice friend with an established and cycled aquarium, ask if you can have one of their used filter media. It will be loaded with the good bacteria that we are looking for.
3. There are products on the market that claim to introduce the beneficial bacteria. For more information, check out products like Biodigest by Prodibio.
Water types to use and avoid
I am going to start out by saying these shrimps are hardy and take a fair bit of abuse but that is by 'shrimp' standards only, not fish, snails and other living tank mates. So using the correct water and testing its parameters is very important, it can help diagnose issues in your tank and also prevent[ the loss of life in your shrimp tank. First you need to decide on what water you will use in your shrimp tank, In short... RO water is the best and you should use it.
RO water
RO water is short for Reverse Osmisis water, it can be purchased directly from all fish stores or you can buy a filter unit to convert your tap water into RO water. I wouldn't advise buying a unit because you won't be doing many water changes and it's cheaper just to buy 25litres of ready made RO for around £2.50 at your Local fish store (LFS), if you buy a unit to produce your own RO water you must keep the filters wet constantly, stay on top of having new filters and you will waste lots of water which isn't usable in your tank (waste water). Reverse osmosis (RO) is a process which purifies water by forcing it through a fine membrane, which leaves impurities behind. This is probably the most practical option for the hobbyist, especially if larger amounts are required, i.e. for multiple tanks.
Distilled water
Distilled water is produced by causing water to boil and turn to steam, which is then cooled (condensed) back into liquid water and collected. This is normally carried out in laboratories and industry, and is not really suitable for the home aquarist to perform. Distilled water is often available bottled however. It may be practical to use it if the required amount is small.
Deionised water (DI)
Deionised water (DI) is produced using special materials which attract ions from the water and bind them to their surfaces. Note that this is not the same as ion-exchange, where one ion is swapped for another, as in domestic water softeners. DI units can produce very pure water, but they are generally expensive to use. The cartridges require frequent replacement, and the amount of pure water produced per cartridge will decrease for tapwater which contains more minerals and contaminents. DI can be useful when included as the final stage on a reverse osmosis unit, where the combination can produce very high purity water.
Tap water
Tap water should NEVER be used in shrimp tanks, no matter how fresh, clean and low in TDS you think it should be. It contains chlorine, chloride and heavy metals that are lethal to Opae'ula. There are a number of ways un-desirables also find their way into our water ways, and chemicals are added to treat/combat this. When farmers grow crops they use a range fertilisers to help them grow and pesticides for obvious reasons, these fertilisers contain high concentrations of Nitrates and Phosphates, when it rains the fertiliser can get washed in to our local water supply.
Whilst the water is being piped through to your home its likely to pick up other elements from the pipes its travelling through including copper, copper can have catastrophic effects in your shrimp tank. Copper is fatal to shrimp and snails. The quality of your tap water will also vary depending upon the time of the year, weather, flooding etc.
Rain/Well water
Rainwater is in theory pure, because it is water which has evaporated and then condensed, similar to distillation, but on a planetary scale! However, a lot of rainwater is likely to be contaminated from the pollution in our atmosphere. If you live in a largely unpolluted part of the world, and decide to use rainwater, apart from the concerns regarding purity, remember that rainwater may be a rather inconsistent source of water at times, so for many people, rainwater is not likely to be a practical source of purer water. There are a few things which should help to ensure it is as pure as possible:
• Do not collect water after a long dry spell, there is likely to be a higher-than-normal amount of containments from the atmosphere. Collect after an initial rainfall has 'cleaned' the air to some extent.
• Only collect the water from a very clean roof or any other source for that matter, store in clean well-aerated containers.
• Filter the rainwater through carbon as an extra precaution - carbon will remove a wide range of toxins and impurities.
Bottled Water
Spring water, mineral water and other bottled waters can vary widely in their composition, depending on the source, and they are not a pure source of water. They can vary from soft and acidic to hard and alkaline, and in some cases may be no more suitable for your shrimp than your tap water or other source! It is also likely to prove expensive for larger amounts. Check the analysis on the bottle if you decide to use bottled water, and/or check the basics with your own test kits.
Water temperature
Although the Opae'ula shrimp will happily live in water temperatures ranging from 15 - 27 DegC which can also fluctuate, I'd advise having a heater in your tank. Especially if you live in the UK or anywhere that is prone to very cold spells (below freezing). The correct way to find out what size heater you need (watts) is to find out how many litres your tank is and match the wattage of the heater. I have a 67litre tank so I have purchased a 75watt heater. It covers the watts to litres rule and has a little more so the heater never has to struggle to keep the heat up to the desired level. The heater has a thermostat which will switch the heater on automatically when it detects the water temperature drops below the 'set' temp, vice versa it will also switch off when the water around it reaches the 'set/required' temperature. Being automated this will keep your tank temperature perfectly regulated.
Testing the tank waters salt levels (Specific gravity/Salinity) and equipment needed
The SG/salinity can be measured with two different pieces of equipment, the 'refractometer' is the very best way to measure your water and costs around £30, it's highly accurate when combined with calibration fluid which can be purchased to make sure the meter is accurate before use.
Refractometer
The best way to measure the salinity and specific gravity of aquarium water is to use a refractometer. These precision optical instruments are incredibly accurate even at very low salt levels, and are equally easy to use. Recently, these instruments have become more affordable, so now every aquarium owner can have one to help monitor water conditions.
This is a refractometer:

Instructions:
• Callibrate the refractometer with the calibration fluid and adjust if needed.
• Place 1 to 2 drops of aquarium water onto the prism glass and close the plate cover.
• Once a fluid sample is placed on the measuring surface, the light passing through it slows and bends. The refractometer focuses this bent light on a tiny internal scale. The scale is magnified by the eyepiece lenses so it is easily visible.
• Look through the eyepiece and view the scale, the top portion of the scale appears blue and the bottom part appears white.
• If the image appears to be out of focus and blurred then use the focus ring to adjust and clear up the reading.
• If you struggle to see the scale because it is to dark/dim then I would advise aiming the meter at a light or out of the window at daylight to increase the image brightness when looking into the device. (Tip* I've sometimes used my phones torch to increase the light input which works well by holding it up to the meter).
• Take your reading at the intersection of the two colours (where blue meets white). One side of the scale measures salinity and the other side measures specific gravity.
• The refractometer will automatically take the water samples temperature into account, this is especially handy when measuring the salt level in freshly made brackish water that is cooler than what's already in your tank. If you are just wanting to measure water direct from your tank then this feature is pretty pointless but if you do wish to match the waters parameters before adding them this is always handy.
Here is an example of what you will see and read from the display;

This shows you the SG reading is 1.028 -> 1.029 and the Salinity is around 37 -> 38 ppt. You can see where the white and blue meets and you can see the results very accurately from the scale. It is important to buy and use calibration fluid if you are going to use the refractometer. This is essentially a pre mixed and verified salt water sample that is made to exactly 35ppt, this is handy because if your meter shows slightly more or less then 35ppm after dropping some of the calibration solution on the plate then you can adjust the calibration screw on the meter and marry up the meter reading cross section to sit at absolute 35ppt giving you a perfect reading on next use with your tank water. It's advisable to do this calibration every time before using your refractometer.
Starting The Nitrogen Cycle WITH shrimp and snails
This is not the preferred way to get the nitrogen cycle started because the shrimp and snails are being exposed to ammonia and nitrites during this process. Some living tank inhabitants may not make it through the cycling process if they are weak or you do not carry out partial water changes to dramatically reduce the Ammonia and Nitrites while they rise during the cycle process.Starting The Nitrogen Cycle WITHOUT shrimp and snails
There are a few different ways to get this process started:Option 1: Using Fish/shrimp food
Drop in a few flakes every 12 hours. As the food decomposes it will release ammonia. You will have to continue to "feed" the tank throughout the process to keep it going.
Option 2: Use some 100% pure ammonia (unscented) that is used for household cleaning.
Using a dropper, add 5 drops of ammonia per 10 gallons of aquarium water. If you don't get an ammonia reading with your test kit, add some more drops until you start to see an ammonia reading. Keep track of how many drops you've used so you can repeat this process daily. Continue to dose the tank with ammonia until you start to get nitrite readings with your test kit. Once you can detect nitrites you should only add 3 drops of ammonia per 10 gallons of aquarium water, or if you added more drops originally to get an ammonia reading cut the amount of drops used in half. Continue this process daily until you get nitrate readings with your test kit. Do a 30% water change and your tank is ready.
Option 3: Use gravel, filter media, substrate, algae or water from an established and complete cycled brackish water tank.
This is the best and fastest way to go. This will seed the tank with all of the necessary bacteria for the nitrogen cycle. "Feed" the tank daily with flake food until you are getting nitrate readings. Depending on how fast you were able to get the gravel and filter media into your tank, you may be getting nitrate readings in only a day or two. Make sure your source has a [b]brackish only tank[/b] and not a marine, tropical or cold-water setup, shrimp will not tolerate copper, medications or other additives which may have been used in the donors tank.
Speeding Up the Cycling Process
There are things you can do to speed along the process of cycling your aquarium:
1. Increase the temperature of your aquarium water to 80°F-82°F (27°C-28°C) ONLY DO THIS IF YOU HAVE AN EMPTY TANK.
2. Get some beneficial bacteria colonies. Borrow some gravel from an established and cycled aquarium. If you have another tank with an extra filter you can use it. If you have a really nice friend with an established and cycled aquarium, ask if you can have one of their used filter media. It will be loaded with the good bacteria that we are looking for.
3. There are products on the market that claim to introduce the beneficial bacteria. For more information, check out products like Biodigest by Prodibio.
Water types to use and avoid
I am going to start out by saying these shrimps are hardy and take a fair bit of abuse but that is by 'shrimp' standards only, not fish, snails and other living tank mates. So using the correct water and testing its parameters is very important, it can help diagnose issues in your tank and also prevent[ the loss of life in your shrimp tank. First you need to decide on what water you will use in your shrimp tank, In short... RO water is the best and you should use it.
RO water
RO water is short for Reverse Osmisis water, it can be purchased directly from all fish stores or you can buy a filter unit to convert your tap water into RO water. I wouldn't advise buying a unit because you won't be doing many water changes and it's cheaper just to buy 25litres of ready made RO for around £2.50 at your Local fish store (LFS), if you buy a unit to produce your own RO water you must keep the filters wet constantly, stay on top of having new filters and you will waste lots of water which isn't usable in your tank (waste water). Reverse osmosis (RO) is a process which purifies water by forcing it through a fine membrane, which leaves impurities behind. This is probably the most practical option for the hobbyist, especially if larger amounts are required, i.e. for multiple tanks.
Distilled water
Distilled water is produced by causing water to boil and turn to steam, which is then cooled (condensed) back into liquid water and collected. This is normally carried out in laboratories and industry, and is not really suitable for the home aquarist to perform. Distilled water is often available bottled however. It may be practical to use it if the required amount is small.
Deionised water (DI)
Deionised water (DI) is produced using special materials which attract ions from the water and bind them to their surfaces. Note that this is not the same as ion-exchange, where one ion is swapped for another, as in domestic water softeners. DI units can produce very pure water, but they are generally expensive to use. The cartridges require frequent replacement, and the amount of pure water produced per cartridge will decrease for tapwater which contains more minerals and contaminents. DI can be useful when included as the final stage on a reverse osmosis unit, where the combination can produce very high purity water.
Tap water
Tap water should NEVER be used in shrimp tanks, no matter how fresh, clean and low in TDS you think it should be. It contains chlorine, chloride and heavy metals that are lethal to Opae'ula. There are a number of ways un-desirables also find their way into our water ways, and chemicals are added to treat/combat this. When farmers grow crops they use a range fertilisers to help them grow and pesticides for obvious reasons, these fertilisers contain high concentrations of Nitrates and Phosphates, when it rains the fertiliser can get washed in to our local water supply.
Whilst the water is being piped through to your home its likely to pick up other elements from the pipes its travelling through including copper, copper can have catastrophic effects in your shrimp tank. Copper is fatal to shrimp and snails. The quality of your tap water will also vary depending upon the time of the year, weather, flooding etc.
Rain/Well water
Rainwater is in theory pure, because it is water which has evaporated and then condensed, similar to distillation, but on a planetary scale! However, a lot of rainwater is likely to be contaminated from the pollution in our atmosphere. If you live in a largely unpolluted part of the world, and decide to use rainwater, apart from the concerns regarding purity, remember that rainwater may be a rather inconsistent source of water at times, so for many people, rainwater is not likely to be a practical source of purer water. There are a few things which should help to ensure it is as pure as possible:
• Do not collect water after a long dry spell, there is likely to be a higher-than-normal amount of containments from the atmosphere. Collect after an initial rainfall has 'cleaned' the air to some extent.
• Only collect the water from a very clean roof or any other source for that matter, store in clean well-aerated containers.
• Filter the rainwater through carbon as an extra precaution - carbon will remove a wide range of toxins and impurities.
Bottled Water
Spring water, mineral water and other bottled waters can vary widely in their composition, depending on the source, and they are not a pure source of water. They can vary from soft and acidic to hard and alkaline, and in some cases may be no more suitable for your shrimp than your tap water or other source! It is also likely to prove expensive for larger amounts. Check the analysis on the bottle if you decide to use bottled water, and/or check the basics with your own test kits.
Water temperature
Although the Opae'ula shrimp will happily live in water temperatures ranging from 15 - 27 DegC which can also fluctuate, I'd advise having a heater in your tank. Especially if you live in the UK or anywhere that is prone to very cold spells (below freezing). The correct way to find out what size heater you need (watts) is to find out how many litres your tank is and match the wattage of the heater. I have a 67litre tank so I have purchased a 75watt heater. It covers the watts to litres rule and has a little more so the heater never has to struggle to keep the heat up to the desired level. The heater has a thermostat which will switch the heater on automatically when it detects the water temperature drops below the 'set' temp, vice versa it will also switch off when the water around it reaches the 'set/required' temperature. Being automated this will keep your tank temperature perfectly regulated.
Testing the tank waters salt levels (Specific gravity/Salinity) and equipment needed
The SG/salinity can be measured with two different pieces of equipment, the 'refractometer' is the very best way to measure your water and costs around £30, it's highly accurate when combined with calibration fluid which can be purchased to make sure the meter is accurate before use.
Refractometer
The best way to measure the salinity and specific gravity of aquarium water is to use a refractometer. These precision optical instruments are incredibly accurate even at very low salt levels, and are equally easy to use. Recently, these instruments have become more affordable, so now every aquarium owner can have one to help monitor water conditions.
This is a refractometer:
Instructions:
• Callibrate the refractometer with the calibration fluid and adjust if needed.
• Place 1 to 2 drops of aquarium water onto the prism glass and close the plate cover.
• Once a fluid sample is placed on the measuring surface, the light passing through it slows and bends. The refractometer focuses this bent light on a tiny internal scale. The scale is magnified by the eyepiece lenses so it is easily visible.
• Look through the eyepiece and view the scale, the top portion of the scale appears blue and the bottom part appears white.
• If the image appears to be out of focus and blurred then use the focus ring to adjust and clear up the reading.
• If you struggle to see the scale because it is to dark/dim then I would advise aiming the meter at a light or out of the window at daylight to increase the image brightness when looking into the device. (Tip* I've sometimes used my phones torch to increase the light input which works well by holding it up to the meter).
• Take your reading at the intersection of the two colours (where blue meets white). One side of the scale measures salinity and the other side measures specific gravity.
• The refractometer will automatically take the water samples temperature into account, this is especially handy when measuring the salt level in freshly made brackish water that is cooler than what's already in your tank. If you are just wanting to measure water direct from your tank then this feature is pretty pointless but if you do wish to match the waters parameters before adding them this is always handy.
Here is an example of what you will see and read from the display;
This shows you the SG reading is 1.028 -> 1.029 and the Salinity is around 37 -> 38 ppt. You can see where the white and blue meets and you can see the results very accurately from the scale. It is important to buy and use calibration fluid if you are going to use the refractometer. This is essentially a pre mixed and verified salt water sample that is made to exactly 35ppt, this is handy because if your meter shows slightly more or less then 35ppm after dropping some of the calibration solution on the plate then you can adjust the calibration screw on the meter and marry up the meter reading cross section to sit at absolute 35ppt giving you a perfect reading on next use with your tank water. It's advisable to do this calibration every time before using your refractometer.
Hydrometer
The next best way to measure your SG/salinity is with the Hydrometer. This works by pouring your water into the meters container and the arm floats up and points to a SG reading. Although this is easier to use its not as accurate but when it comes to SG swings the Opae'ula shrimp still thrives as it adapts naturally. :)Here is an example of what you will see and read from the display;
Instructions:
Before use, condition hydrometer by soaking it in saltwater for 24 hours.Step 1 - Slowly fill the Instant Ocean Hydrometer by dipping bottom corner fill port below water surface until water flows up and over inner weir.
Step 2 - Dislodge air bubbles by gently tapping hydrometer or pointer. Air bubbles on the pointer may result in inaccurate results.
Step 3 - Place the hydrometer on a level surface and read specific gravity (inside scale) and salinity (outside scale).
Care:
Rinse thoroughly in freshwater after each use to prevent mineral/salt buildup which can affect accuracy. Salt and calcium deposits that accumulate on the pointer will result in incorrect results. If crystallization occurs inside the unit, soak in lukewarm water or vinegar for 30-minutes, rinse with freshwater and air dry.A downside to the hydrometer is if you are only using a small tank you *may* struggle to fill the meter up enough to a get a reading without emptying the majority of your tank water out, thus stressing out the shrimp. If however you are using it just to make up batches of brackish water then it's absolutely fine to use. Unfortunately the 'Hydrometer' doesn't compensate the waters temperature if it's cold (below 20 degrees) and may show a slightly different reading when up to tank temperature. Being honest though this isn't really a game changer as Opae'ula are highly adaptable and adding your fresh brackish water during a water change can be slightly higher or lower in SG/Salinity and still be fine, plus you won't be doing many water changes to warrant this feature. If you are just wanting to take water out of your tank which is already up to the correct temperature then that feature from the 'refractometer' is pretty pointless.
Water Quality test kits
Next you need to decide what sort of test kit to use, liquid test kits or the cheaper less accurate dip strips. Liquid test kits come as 'fresh water' and 'salt water' variants. As we are making and using brackish water you should buy the salt water version. These are priced around the £30 mark but will last for hundreds of tests (check expiry dates before purchase as longer the better!) They will show and measure; ammonia, nitrites, nitrates and PH levels when mixed with your tank water sample and compared to the chart which is included. They are highly accurate compared to 'test strips' which you dip in the tank water and compare to a chart. The test strips are very inaccurate and don't test for ammonia, albeit more convenient to use.Liquid test kits
These kits will test Your aquarium water for 4 key parameters that affect the health of your brackish water tank, High Range pH, Ammonia, Nitrite, Nitrate. These are really all the important checks you need to preform and continually test.IMPORTANT! information regarding the Nitrate test for liquid test kits.
Liquid Nitrate Test Kits from any manufacturer can have a common problem with their last test solution bottle. For some companies, it is bottle number 3, but for API liquid test kits it is bottle number 2. One of the ingredients wants to solidify out of liquid solution and stick to the bottom of the bottle. If the test bottle sits for any period of time, this can happen. If this does happen and the test is performed without Bottle # 2 being shaken and mixed properly, then you can get a false low reading. This can be corrected by tapping your Bottle # 2 firmly a few times on a table or counter top. This should loosen-up anything that has solidified in the bottom of the bottle. Then shake this bottle for about 2-3 minutes, to really mix it up before use. This method will prevent false readings and ensure your tank water isn't incorrectly tested for an unsafe level of Nitrates.
IMPORTANT! - Do not put the glass test tubes directly into your shrimp tank, if any of the test kit chemical is still in this when introduced to the tank directly there is a chance of poisoning your whole tank!
Pros:
• This kit will test all 4 important water parameters including ammonia.
• Compared to other test methods the liquid test kit is a lot more accurate.
• Each kit will provide you with over five hundred tests, so after the initial purchase you will save money as test strips have to be used once and thrown away.
Cons:
• The upfront cost is higher then test strips.
• You have to wash the test tubes after every use.
• Takes at least 5 minutes per test to complete.
Here is an example of an API liquid test kit:
Dip strip tests
Dip strip tests are precisly that, a test strip that you dip in your tank water for a few seconds, remove and leave to one side for the test indicators to activate and show you a coloured patch which you line up against a chart and this gives you the reading from your tank water.Pros:
• Fast to measure water qaulity and get results.
• Initial cost is cheaper then a liquid test kit.
Cons:
• You can only use each strip ONCE.
• Not very accurate results which can be misleading.
• Does NOT measure ammonia.
Here is an example of an API Dip strip test kit:
Instructions:
1. Dip strip directly into aquarium.2. Swirl 2 times.
3. Remove horizontally with pads face up.
4. DO NOT shake OFF excess water.
5. Compare to the colour chart on the tube.
6. Starting with the pad closest to your hand, immediately read General Hardness (GH) and Carbonate Hardness (KH).
7. Wait 30 seconds, then read pH, Nitrite (NO2-) and Nitrate (NO3-).
TDS pens
A TDS Meter measures the amount of Total Dissolved Solids (TDS) in a solution.Since dissolved ionized solids like salts and minerals contribute to the conductivity of a solution, a TDS meter measures the conductivity of the solution which is then converted to a TDS reading.
TDS is directly related to quality of water i.e., the lower a TDS figure, the more pure the water. As an example, reverse osmosis purified water will have a TDS between 0 and 10, whereas tap water will vary between 20 and 300.
Here is an example of an TDS Pen:
Instructions:
Taking Measurements1. Remove the protective cap.
2. Turn the TDS meter on. The ON/OFF switch is located on the panel.
3. Immerse the meter into the water/solution up to the max. immersion level (2”).
4. Lightly stir the meter to dislodge any air bubbles.
5. Wait until the display stabilizes. Once the reading stabilizes (approx. 10 seconds), press the HOLD button to view the reading out of the water.
6. If the meter displays a flashing “x10” symbol, multiply the reading by 10.
7. After usage, shake off any excess water from your meter. Replace the cap.
What are we testing for?
I will explain what you are testing for here briefly but for a more detailed understanding please see the nitrogen cycle section HERE.Ammonia
This is Very harmful to tank life and comes from die off, decomposing tank inhabitants and uneaten food mostly. This needs to be a zero when you have shrimp in the tank.Nitrites
This is harmful to tank life although not as toxic as ammonia, it will still kill off your shrimp so it needs to be kept to a minimum at all times. If you are cycling your tank without anything living then you do not need to worry about Nitrites as this will get removed and converted after the cycle is complete. However you must keep them low while cycling your tank if you have shrimp already situated in water. This must remain at zero ppm when fully cycled, this is a by-product of the ammonia being eaten by the first set of beneficial bacteria you need.Nitrates
This is the least harmful by-product created by the nitrogen cycle, more specifically its the 2nd set of beneficial bacteria eating the nitrites which creates the Nitrates. Ideally you want to keep this as low as possible but shrimp will survive with low levels e.g. 10ppm. If you are getting rising nitrates then food is rotting in your tank or something is dead, releasing ammonia, being turned into nitrites then being made into nitrates. The nitrates are removed in the form of water changes. (Fresh brackish water added) by yourself, feed very sparingly will keep your water healthy for years resulting in less water changes needed.PH
PH is going to show you if your water is too acidic (soft) or alkaline (hard), we want to aim for around 8.2 - 8.4ppm. Having the water too acidic will damage the shrimps moulting regime. This will also result in your snails sells breaking down and not growing/regenerating). As you will be using pure RO water it will become acidic over time.TDS
This is Total Dissolved Solids, it isn't very important to be aware of as when it comes to Opae ula tanks in particular as the shrimp can tolerate from 0 up to 1500 TDS so you never need to worry about checking this, although it's fun and quick to test.Specific Gravity (SG)/Salinity
Specific Gravity and salinity is the measure of salt in your water, it's advisable to aim for 1.008/1.010 upto 1.015 SG or 9 to 15ppt salinity for the Opae ula shrimp. Although they can tolerate less or more you want them to be happy and comfortable so they breed and show a nice red colour.The ideal water parameters
Ideally you should try and aim for these parameters:• Ammonia - 0ppm
• Nitrites - 0ppm
• Nitrates - as low as possible reaching over 10ppm and you are asking for trouble.
• PH - 8.0 - 8.4
• SG - 1.008 - 1.015
• TDS - 100 - 1500 (you really don't need to worry about this one)
• Temperature - Ideally between 18C [64.4F] to 25C [77F] (shrimp successfully 'berried'/produced eggs)
If your shrimp tanks water quality isn't very good/healthy then you put your shrimps, snails and other living tank creatures at an increased risk of dying. They are pretty 'hardy' shrimps but why scrimp on their health and your investment.